Table of Contents
- Introduction
- Terms and Definitions
- TerminalApp Configuration
- Source Code Examples
- Communication Protocol
- Functions
- Integration Modes
- Broadcast Receiver Integration
- Cross-cutting Concerns
Introduction
This document outlines integration strategies for Tidypay's payment application with POS systems. It focuses on the communication protocol, primary modes of integration: Managed Mode, Proxy Mode, and communication using BroadcastReceiver.
Terms and Definitions
| Term | Description |
|---|---|
| Terminal App | Payment application provided by Tidypay |
| POS Client Demo | POS demo application supplied by Tidypay meant to host an example of the integration with Terminal App in different modes of operation. |
| POS | Point-Of-Sale system of the integrator |
| ProxyApp | Lightweight application that gets installed side-side with Terminal App to facilitate data exchange between the remote POS system and the Terminal App. |
| TMS | Terminal Management System |
TerminalApp Configuration
To ensure proper functionality of the Terminal App, the network and firewall settings shall be configured according to the following requirements:
Internet Connectivity Checks:
a. The Terminal App verifies internet availability by pinging the following addresses:
- http://google.com
- 8.8.8.8
TMS Requests:
a. Host: TMS host
b. Port: 443
Transaction Processing:
a. Host: GatewayHost
b. Port: 443
Source Code Examples
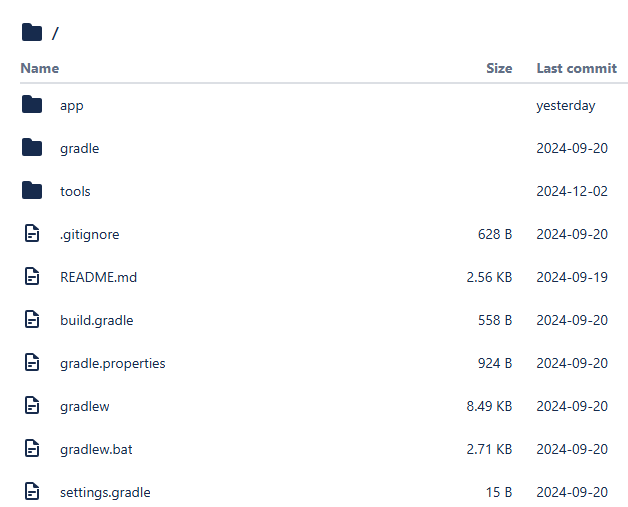
POS Client demo Android application that interacts with Terminal App in different modes.
In Tools folder there is the Proxy app.zip that contains
A simple demo proxy application.
Java PC program that can be used to test connections from a PC to a payment device.
Communication protocol
Data flow
Framework
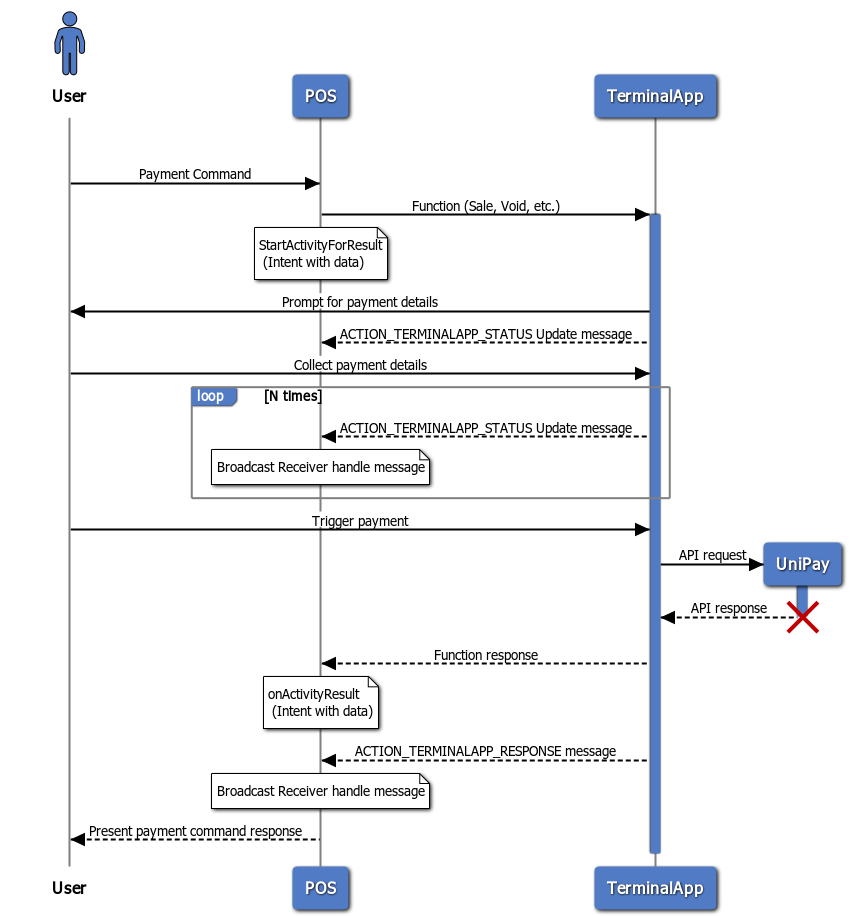
The typical communication flow with using Android Intents to be executed between the integrator’s POS system and the Terminal App incurs the following phases:
- Registration of Intent for handling API requests.
Enable querying of installed applications on the device by either enabling All or selective through package names.
<manifest xmlns:android="http://schemas.android.com/apk/res/android"
    xmlns:tools="http://schemas.android.com/tools">
    <queries>
        <package android:name="com.tidypos.terminal" />
        <package android:name="com.tidypay.softpos" />
    </queries>
    ...
    <!-- or -->
    <uses-permission android:name="android.permission.QUERY_ALL_PACKAGES"
        tools:ignore="QueryAllPackagesPermission" />
    ...
</manifest>
- Execute payment function
Start Terminal App by passing the command to execute via the Intent. To do this, the activity with the method
startActivityForResult(intent, REQUEST_CODE);
shall be used. The REQUEST_CODE is a user-defined integer code.The response will be received in the onActivityResult method of the current activity, the prototype of which looks as follows:
onActivityResult(int requestCode, int resultCode, @Nullable Intent data)
- Reading information from the data intent on the POS side.
The accepted intent has a mandatory extras object named response containing a Map<String, String>. The data can be obtained as follows
Map<String, String> responseMap = (Map<String, String>) data.getSerializableExtra("response");
If the dataType key is present in the map and its string value is equal to 'list', then the intent should have a second extras named 'data' containing data on the previously sent request. The data itself is a Uri type containing a link to the file with the processing result.
The data can be obtained as follows:
Uri receivedUri = intent.getParcelableExtra("data");
In case of the presence of a second extras object, the map also contains the ’dataChecksum’' field, which contains the checksum of the file calculated by the SHA1 algorithm.
- Loading the generated file from a response
The generated file with the result is loaded through an 'InputStream' object, which is obtained using the getContentResolver().openInputStream(receivedUri) method. Previously received shall be passed as an input param.
The full example of the process that involves handling a list of data populated is presented in the Transaction reports.
The back channel data flow with real-time notifications and updates about payment progress from Terminal App to POS is described in BroadcastReceiver Integration.
Data structures
Regardless of the integration mode, the data fields used to populate requests and responses are specified in Tidypay Terminal API depending on the request being made.
Note! Even though required in the API specification, accountId and transactionId fields can be skipped from transmission in POS because Terminal App is capable of figuring them out based on the configuration applied. This applies to all methods with a few exceptions to be highlighted individually.
All API requests, regardless of a type, include a response data structure. However, the requests with an attachment, which deal with larger data volumes, also include a data structure. This data structure contains a URI linking to an attachment and is included in addition to the usual response structure.
The data structure in the response provides the URI to this temporary file containing the data. This data structure is sent alongside the response structure in the API response.
Besides the standard fields described in the specification, the terminal adds two additional fields in the response structure:
● dataType: indicates the format of the response (details below).
● dataChecksum: a checksum that can be used to validate the integrity of the attachment, if the last is included in the data structure.
The dataType field indicates how to interpret the response:
● 'no data'- there is nothing to analyze, the request returns no information.
● 'error'- the response generates an error. Details can be found in the responseCode and responseMessage fields.
● 'detail' (default type) - the response should be interpreted according to the format described in theTidypay Terminal API API documentation.
● 'list'- the response includes an attachment with the list of data in JSON format, and the data should be handled accordingly. This data type is used in transaction reporting functions.
Functions
Sale
API format
Example
Please refer to Example Of Sale in Managed mode in the managed mode and Example of Sale in Proxy mode
Sale Auth
API format
Example
// Analogous to a Sale command example except request type being different as a line below
params.put(TerminalReq.RequestType, RequestType.SaleAuth);
Capture
API format
Example
private void processCapture() {
    MainApp app = (MainApp) getApplicationContext();

    TransactionResponse latest = app.getLatestTransactionResponse();

    if (latest != null && latest.getResponseType().equals(RequestType.SaleAuth.getValue())) {
        TerminalAPI.setCredentials(API_TIDYPAY_CREDENTIALS);
        Map<FieldName, Object> params = new HashMap<>();
        params.put(TerminalReq.RequestType, RequestType.Capture);
        params.put(TerminalReq.TransactionId, latest.getTransactionId());
        TerminalAPI.exec(this, params, TerminalAPI.CAPTURE_REQUEST_CODE);
    } else {
        ...
    }
}
Note! The TransactionId field is mandatory for the Capture function. Typically, POS is going to cache the response of the Sale-Auth transaction and use it whenever Capture is invoked..
Void/Refund
API format
Example
private void processRefundRequest(String transactionId) {
    TerminalAPI.setCredentials(API_TIDYPAY_CREDENTIALS);

    Map<FieldName, Object> params = new HashMap<>();
    params.put(TerminalReq.RequestType, RequestType.Refund);
    params.put(TerminalReq.TransactionId, transactionId);

    TerminalAPI.exec(this, params, TerminalAPI.REQUEST_CODE);
}
Note! The TransactionId field is mandatory and Transaction Code is optional.
Note! No matter what exactly is put into the Request Type field, Terminal App works out whether the Void or Refund gets applied depending on the transaction status, e.i, if it was settled already or not.
Voiding Logic
Voiding logic is designed so that if the terminal is uncertain about the status of a previous transaction then it will send a Void request for this transaction to the Gateway. In the gateway the status might indeed be approved but this has not reached the terminal. The voiding logic does not kick in before another action is taken in the Terminal App itself like performing a transaction request, running Get parameters, or something else that validates the connection to the Gateway.
Find requests can be used in the background of the POS system to fire off the validation to the Gateway prematurely without waiting for a subsequent transaction to occur.
Please refer to the Find section for more information about the *Find *function.
Find
Find request allows to fetch the status of the existing transaction - both settled and unsettled.
API format
Example
private void processFindRequest(String transactionCode) {
    TerminalAPI.setCredentials(API_TIDYPAY_CREDENTIALS);

    Map<FieldName, Object> params = new HashMap<>();
    params.put(TerminalReq.RequestType, RequestType.Find);
    params.put(TerminalReq.TransactionCode, transactionCode);

    TerminalAPI.exec(this, params, TerminalAPI.FIND_REQUEST_CODE);
}
Note! Find response data contains less fields when hitting unsuccessful transaction as some fields are not fully transmitted to POS. This issue will be circumvented in one of the next Terminal App releases.
Close batch
API format
Example
private void processCloseCycleRequest() {
    TerminalAPI.setCredentials(API_TIDYPAY_CREDENTIALS);
    Map<FieldName, Object> params = new HashMap<>();
    params.put(TerminalReq.RequestType, RequestType.CloseCycle);
    TerminalAPI.exec(this, params, TerminalAPI.REQUEST_CODE);
}
Transaction reports
API format
Transaction List and Transaction Summary of the day
Example
The Transaction List API data flow and extraction can be viewed in the following pseudo code snippet. It implements the scenario that:
Searches for all the 'Unsettled' transactions made on the given terminal within the last 30 minutes.
EST time zone is facilitated. This time zone is set by default in the Sandbox environment.
The received 'list' of transactions gets downloaded in JSON format.
Checksum calculations, exception handling, and processing the results of the reports are omitted for the sake of simplicity.
private void processTransactionReportRequest() {
    TerminalAPI.setCredentials(API_TIDYPAY_CREDENTIALS);
    Map<FieldName, Object> params = new HashMap<>();
    params.put(TerminalReq.RequestType, RequestType.TransactionList);
    params.put(TerminalReq.SettlementStatus, "unsettled");
    params.put(TerminalReq.ReportBasis, "authorizationDate");
    params.put(TerminalReq.AccountId, 6001);
    params.put(TerminalReq.TerminalId, 3);

    // Get the current time in UTC
    Calendar calendar = Calendar.getInstance(TimeZone.getTimeZone("UTC"));
    SimpleDateFormat formatter = new SimpleDateFormat("yyyyMMddHHmmss");
    // Change the time zone to EST. This is for Sandbox environment only
    formatter.setTimeZone(TimeZone.getTimeZone("EST"));
    String toTime = formatter.format(calendar.getTime());
    // Subtract 30 minutes from the current time
    calendar.add(Calendar.MINUTE, -30);
    String fromTime = formatter.format(calendar.getTime());
    params.put(TerminalReq.ReportFromDate, fromTime);
    params.put(TerminalReq.ReportToDate, toTime);

    TerminalAPI.exec(this, params, TerminalAPI.REPORT_REQUEST_CODE);
}

private void processTransactionReportResponse(Integer resultCode, Intent intent) {
    Map<FieldName, String> responseMap = TerminalAPI.getResponseParameters(intent);
    String checkSum = responseMap.get(TerminalRes.DataChecksumType);
    int countOfTransactions = 0;
    if ("list".equalsIgnoreCase(responseMap.get(TerminalRes.DataType))) {
        Uri receivedUri = intent.getParcelableExtra("data");
        if (receivedUri != null) {
            try (InputStream inputStream = getContentResolver().openInputStream(receivedUri);
                 BufferedReader reader = new BufferedReader(new InputStreamReader(inputStream))) {
                StringBuilder stringBuilder = new StringBuilder();
                String line;
                while ((line = reader.readLine()) != null) {
                    stringBuilder.append(line);
                }
                String jsonString = stringBuilder.toString();
                // TODO: Check the integrity by calculating the SHA1 checksum of the received file against the value transmitted in the main 'response'
                try {
                    JSONArray jsonArray = new JSONArray(jsonString);
                    countOfTransactions = jsonArray.length();
                    getContentResolver().delete(receivedUri, null, null);
                } catch (JSONException e) {
                    // Handle JSON parsing error
                }
            } catch (Exception e) {
                // Handle Parsing error
            }
        }
    }
    // ...
}
Note! As opposed to other requests, among the mandatory input arguments, ‘accountId’ and ‘terminalId’ are present that accurately match the configured Terminal App on the given device. Without correctly specifying those, Terminal App will reject the request with the error message similar to this ‘User name or password are incorrect.’ A very common scenario for obtaining the required fields would be to extract them from a Sale transaction responses and use them eventually in Transaction report queries.
Integration Modes
Managed Mode (App-to-App Switching)
Overview
Managed mode implies installing a POS application on the terminal where the Terminal App resides. The illustration below shows how the interactions between POS and Tidypay components take place in this mode:
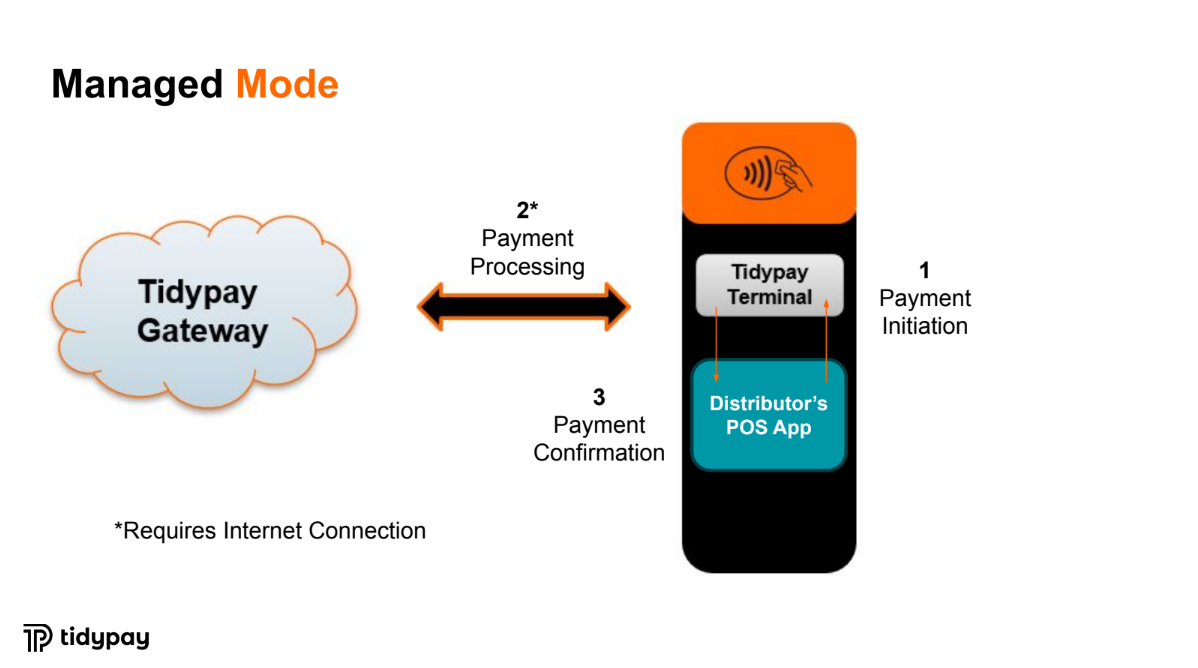
When POS attempts to make a payment transaction, the Intent with transaction details such as Amount, Transaction Code, etc. is sent to the Terminal App. Terminal App becomes a foreground process that completes the transaction before returning back a control to POS.
Apparently, the POS application runs in the background while payments and other operations get processed.
Features:
High-speed transaction processing with excellent stability.
Commonly used in mobile POS setups or all-in-one solutions.
Operations supported include: Sale, Refund, Void, Close Cycle, Find and others.
Technical Considerations
Managed Mode relies on Android's Intent mechanism to facilitate communication between the POS app and the Terminal App.
The following code snippets below outline the principle of delegation of the *Sale *transaction request to the Terminal App alongside the processing of a response delivered when the transaction is finished.
private void processSaleRequest(Integer amount) {
    TerminalAPI.setCredentials("api-userName:api-password");
    Map<FieldName, Object> params = new HashMap<>();
    params.put(TerminalReq.RequestType, RequestType.SALE);
    params.put(TerminalReq.Amount, amount);
    params.put(TerminalReq.TransactionCode, "0000000001");
    TerminalAPI.exec(this, params);
}

// In TerminalAPI class
public static void exec(Activity activity, Map<FieldName, Object> params, Integer requestCode) {
    try {
        Intent intent = locateTerminalAppApplication(activity);
        // Validations skipped
        params.putAll(defaults);
        intent.putExtra(Fields.PARAMS, convertRequestMap(params));
        intent.putExtra(Fields.CREDENTIALS, credentials);
        intent.setFlags(0);
        activity.startActivityForResult(intent, requestCode);
    } catch (Exception e) {
        throw UniPayException.s20(e);
    }
}

public class TerminalReceiver extends BroadcastReceiver {
    private static final String ACTION_TERMINALAPP_RESPONSE = "ACTION_TERMINALAPP_RESPONSE";
    private static final String ACTION_TERMINALAPP_STATUS = "ACTION_TERMINALAPP_STATUS";

    @Override
    public void onReceive(Context context, Intent intent) {
        SharedPreferences prefs = context.getSharedPreferences(context.getPackageName() + "_preferences", MODE_PRIVATE);
        String action = intent.getAction();
        if (action != null) {
            switch (action) {
                case ACTION_TERMINALAPP_STATUS:
                    //...
                    break;
                case ACTION_TERMINALAPP_RESPONSE:
                    String responseStr = intent.getStringExtra("data");
                    if (responseStr != null) {
                        try {
                            PayResult payResult = new PayResult();
                            TransactionResponse transactionResponse = TransactionResponse.fromJSON(responseStr);
                            String responseCode = transactionResponse.getResponseCode();
                            String returnStr = transactionResponse.getResponseMessage();
                            if (responseCode != null && (responseCode.equals("A01") || responseCode.equals("A02"))) {
                                payResult.approved = true;
                                payResult.reciept = prefs.getString("merchant_name", "") + "\n" + prefs.getString("merchant_regno", "") + "\n\n" + emvData;
                            } else {
                                // ...
                            }
                        } catch (Exception e) {
                            // Handle exception
                        }
                    }
                    break;
                default:
                    break;
            }
        }
    }
}
Note! Pseudo code above demonstrates principles of handling transaction response with a support of Broadcast Receiver component and specific actions transmitted from a Terminal App. An alternative handling scenario would imply processing of data returned in activity onActivityResult callback as a result of startActivityForResult call initiated before.
Please refer to the Examples section for getting references to an example implementation of the POS Client Demo application.
Proxy Mode
Overview
Proxy mode is an advanced solution that takes managed mode to the next level. To use it, you must install a small Android app on the payment device where Terminal App lives and transfer the data from the payment application into a TCP/IP socket stream. This allows the cash register (POS) to communicate with the payment device over four different network carriers: Wi-Fi, wired Ethernet, Bluetooth tethering, and USB cable tethering. Bluetooth and USB cable tethering also allow sharing the 4G mobile connection with the cash register, which is perfect for situations where DSL or fiber optic connections are not accessible.
The proxy mode uses an application that listens for any connection on a specific port. Whatever comes in the socket is relayed to the Intent, just like in the managed mode example. The result coming back from the intent is then sent back to the calling cash register’s (POS) TCP/IP socket. The data format of the data sent and received will be the same as in managed mode, except conversion and delivery in JSON format.
The benefits of using proxy mode are:
Works independently of network carriers.
Provides blazing-fast communication.
Allows the use of the payment device's screen as a marketing device, which can even be interactive.
Enables wiring the device to a PC with a USB cable for charging and data communication.
Ideal for 4G operation with USB or Bluetooth option.
More stable, as it does not require a stable internet connection.
However, there are some cons to consider:
Requires more development resources
Needs more initial configuration
The illustration below shows how the interactions between POS and Tidypay components take place in this mode:
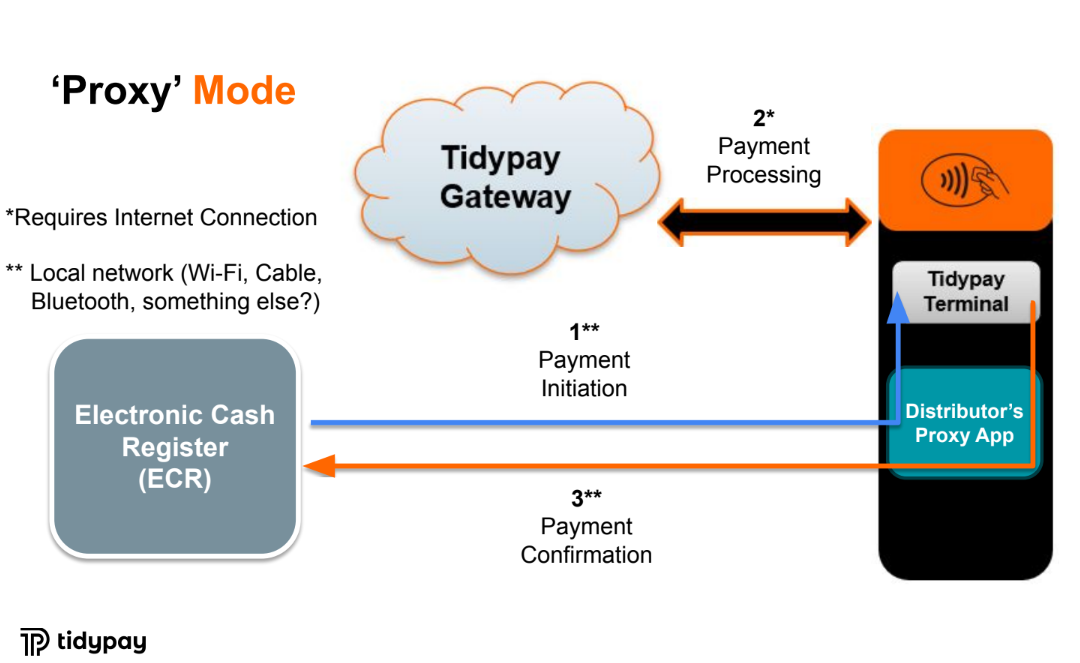
Note! Proxy App becomes a responsibility of a POS integrator to develop and maintain. Even though it is a lightweight application, it has to support proper transfers of data structures using TCP/IP protocol from/to Intents data communicated with Terminal App.
Features:
High-speed transactions over local networking (Wi-Fi, USB, Bluetooth).
Ideal for high-volume retail or Electronic Cash Register (ECR) integrations.
Technical considerations
Data is formatted as JSON and transmitted via a socket to the terminal.
An example below contains a pseudo code that forms a Sale request:
private void processSaleRequestProxy(Integer amount) {
    Map<FieldName, Object> params = new HashMap<>();
    params.put(TerminalReq.RequestType, RequestType.SALE);
    params.put(TerminalReq.Amount, amount);
    Map<String, String> map = convertRequestMap(params);
    new Thread(new SendReceiveIP(new JSONObject(map).toString())).start();
}
Note! It is worth pointing out that the example above resembles to a large extent the code for managed mode. And this is true as a bulk of differences lie in the conversion of a map to JSON and then transporting it via TCP/IP routine.
BroadcastReceiver Integration
This component is essentially a back channel for pushing Terminal App transaction updates down to the POS system.
BroadcastReceiver's goal is to subscribe to notifications coming from the Terminal App and react correspondingly in the POS system.
Two types of actions/notifications are supported:
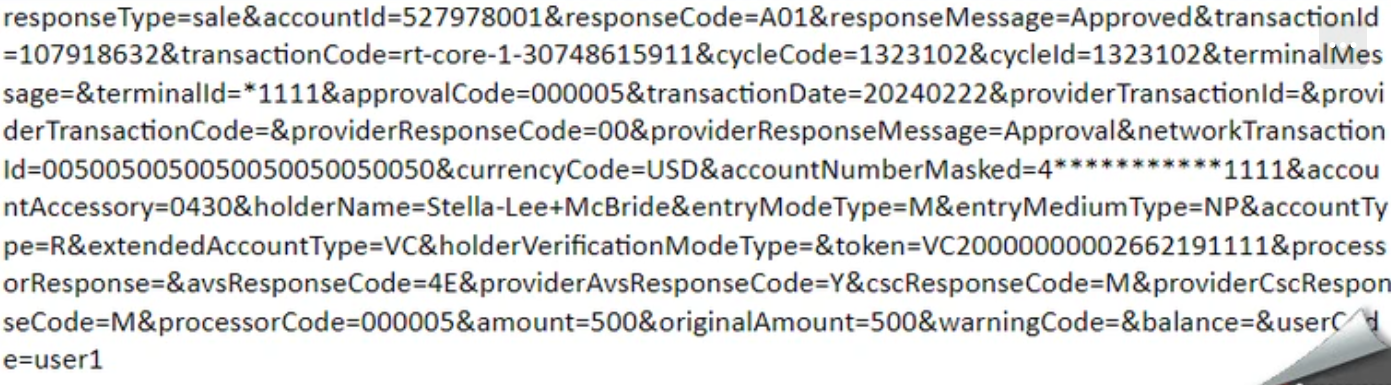
Transaction Responses
Action Name: ACTION_TERMINALAPP_RESPONSE
Content: Includes transaction response details in JSON format similar to the API server response.
Status Notifications
Action Name: ACTION_TERMINALAPP_STATUS
Content: Carries information about a certain screen displayed on the terminal
Data format:
| Field | Description | Possible Values |
|---|---|---|
| screenCode | The screen displayed in the Terminal App | 'present-card', 'enter-pin', 'select-application', 'visualize-result', 'provide-signature', 'confirm-signature' |
| entryMode | Possible payment methods | 'tap', 'insert', 'swipe', 'manual', 'tap|insert', 'tap|swipe', 'tap|manual', 'insert|swipe', 'insert|manual', 'swipe|manual', 'tap|insert|swipe', 'tap|insert|manual', 'tap|swipe|manual', 'insert|swipe|manual', 'tap|insert|swipe|manual' |
| screenMessage | Title or message on the screen.The parameter corresponds to the text of the current screen except for the screen Tap, Insert or Swipe |
Code Example
public class TerminalAppResponseReceiver extends BroadcastReceiver {
    @Override
    public void onReceive(Context context, Intent intent) {
        String response = intent.getStringExtra("response");
        Log.d("TerminalResponse", response);
    }
}
Comparison of Integration Modes
| Feature | Managed Mode | Proxy Mode |
|---|---|---|
| Ease of Use | Medium | Low |
| Device Dependency | Yes | No |
| Transaction Speed | Fast | Fast |
| Stability | Very High | High |
| Setup Complexity | Easy | Medium |
| Support Requirements | Low | Medium |
| Flexibility | Medium | Very High |
Cross-cutting concerns
API Authentification
In each API call userName and password shall be provided.
The respective credentials shall be requested from Tidypay.
The password to be provided is static and is not rotated.
Identification of the transactions
Transaction Code parameter is recommended to be used for identification of the transaction within an external system. e.i. POS, that submits the transaction for processing. This allows for cross-referencing of entities between the Tidypay system and a submitter’s (POS) system.
This allows POS to request information about the transactions or make commands using *Transaction Code *when sending to Tidypay rather than using internal *TransactionID *(which is a Tidypay identifier). This, in-turn, also ensures that the POS and Tidypay can be reconciled properly.
Duplicate Transaction handling
The Tidypay system supports different policies of how Sale transactions behave in case the same Transaction Code is passed.
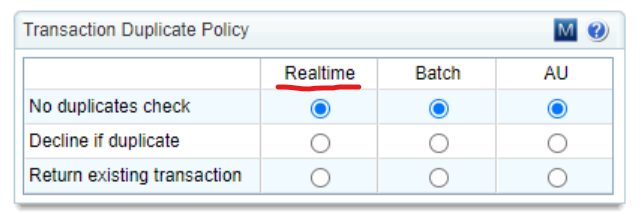
Note! "Return existing transaction" option is recommended. This way, the POS will always receive the 'correct' response, including if it turns out to be a duplicated transaction.
Let’s review scenarios when POS conducts two real-time transactions through usage of *Transaction Code *under different Transaction Duplicated Policy settings applied.
Let's assume that the first transaction (TR1) with a certain transactionCode (TC) was posted using the Sale API. We will check how the system processes a request to post a second transaction (TR2) with the same transactionCode (TC), considering the status of the first transaction (TR1): Approved, Declined, Voided, or Refunded.
Setting: No duplicates check = ON
| Case # | Precondition | Test | Result |
|---|---|---|---|
| 1 | TR1 = Approved | POST requestType=Sale with the same TC | TR2 is posted: |
| responseCode=A01 | |||
| responseMessage=Approved | |||
| 2 | TR1 = Decline | POST requestType=Sale with the same TC | TR2 is posted: |
| responseCode=A01 | |||
| responseMessage=Approved | |||
| 3 | TR1 = Void | POST requestType=Sale with the same TC | TR2 is posted: |
| responseCode=A01 | |||
| responseMessage=Approved | |||
| 4 | TR1 = Refund | POST requestType=Sale with the same TC | TR2 is posted: |
| responseCode=A01 | |||
| responseMessage=Approved |
Note! If there are multiple transactions with the same Transaction Code, then the requestType=find returns the ID of the most recently posted transaction.
Setting: Decline if duplicate = ON
| Case # | Precondition | Test | Result |
|---|---|---|---|
| 1 | TR1 = Approved | POST requestType=Sale with the same TC | responseCode=V29 |
| responseMessage= The transaction you are trying to process is a duplicate of a recently processed transaction | |||
| 2 | TR1 = Decline | POST requestType=Sale with the same TC | responseCode=V29 |
| responseMessage= The transaction you are trying to process is a duplicate of a recently processed transaction | |||
| 3 | TR1 = Void | POST requestType=Sale with the same TC | responseCode=V29 |
| responseMessage= The transaction you are trying to process is a duplicate of a recently processed transaction | |||
| 4 | TR1 = Refund | POST requestType=Sale with the same TC | responseCode=V29 |
| responseMessage= The transaction you are trying to process is a duplicate of a recently processed transaction |
Setting: Return existing transaction = ON
| Case # | Precondition | Test | Result |
|---|---|---|---|
| 1 | TR1 = Approved | POST requestType=Sale with the same TC | TR1 is returned in the response |
| 2 | TR1 = Decline | POST requestType=Sale with the same TC | responseCode=V29 |
| responseMessage=The transaction you are trying to process is a duplicate of a recently processed transaction | |||
| 3 | TR1 = Void | POST requestType=Sale with the same TC | responseCode=V29 |
| responseMessage=The transaction you are trying to process is a duplicate of a recently processed transaction | |||
| 4 | TR1 = Refund | POST requestType=Sale with the same TC | responseCode=V29 |
| responseMessage=The transaction you are trying to process is a duplicate of a recently processed transaction |
Note! requestType=find through Transaction Code returns the transaction data regardless of the payment result.